Adding Google reCAPTCHA v3 to a PHP form
A simple example showing how to add the new Google reCAPTCHA v3 to a PHP form. reCAPTCHA v3 helps detect abusive traffic without getting in the way of legitimate users.
November 2018
Google reCAPTCHA has become one of the most popular solutions when it comes to preventing spam contact form submissions and abusive traffic on websites.
While it is great for stopping bots in their tracks, it often annoys legitimate users by asking them to click on a number of vehicles in a square or street-signs.
reCAPTCHA v3 aims to provide the same spam-filtering capabilities, while also staying out of the way of the user. It does so by tracking the activities of the user, and assigning a score to them. You can then perform relevant actions depending on this score, such as blocking the submission requiring manual verification, or allowing it to go through. Here's a video from Google explaining it:
Registration
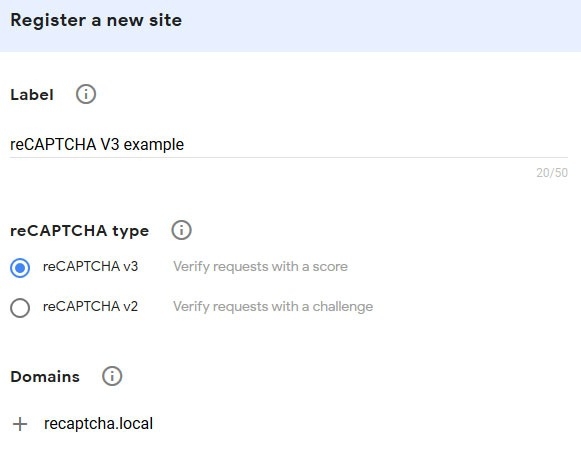
The first step is to go to the reCAPTCHA page and login with a Google account. When signed in, go to the 'Register a new site' box. Enter a suitable label (the website name), choose 'reCAPTCHA v3', add any required website domains and click 'Register':
After registration, you will be provided with both a 'Site key' and a 'Secret key'. These will be needed to configure the form on the domains provided in the previous step.
Client side integration
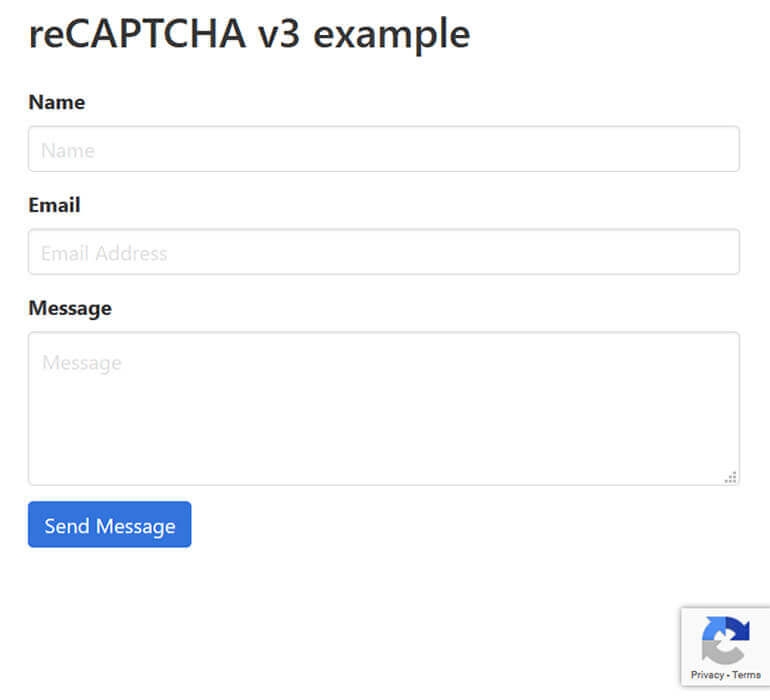
For this example, I'm using a very simple contact form. It contains 3 fields (Name, Email Address, Message) and a 'Send Message' button. I'm using the Bulma CSS framework for some quick and easy styling of the form. The PHP and JS code can obviously be split into external files, but I'm keeping it all in one file to keep the example short and simple.
Create a file named 'index.php' and add the following:
<!DOCTYPE html>
<html>
<head>
    <meta charset="utf-8">
    <meta name="viewport" content="width=device-width, initial-scale=1">
    <title>Google reCAPTCHA v3</title>
    <link rel="stylesheet" href="https://cdnjs.cloudflare.com/ajax/libs/bulma/0.7.2/css/bulma.min.css">
    <script src="https://www.google.com/recaptcha/api.js?render=YOUR_RECAPTCHA_SITE_KEY"></script>
    <script>
        grecaptcha.ready(() => {
            grecaptcha.execute('YOUR_RECAPTCHA_SITE_KEY', { action: 'contact' }).then(token => {
              document.querySelector('#recaptchaResponse').value = token;
            });
        });
    </script>
</head>
Replace 'YOUR_RECAPTCHA_SITE_KEY' with the key provided to you in the reCAPTCHA dashboard. Consider adding your keys to a .env file when moving to production.
The grecaptcha.ready function will run when the service has fully loaded and created a token for the current user. The 'action' should relate to the current page or operation being performed. I'm using 'contact' in this case as it's being applied to a contact form. I've configured the function to grab a hidden form input and pass the token through to the value of the input.
The code below is used to create the contact form itself:
<body>
    <section class="section">
        <div class="container">
            <div class="columns">
                <div class="column is-half">
                    <form method="POST">
                        <h1 class="title">
                            reCAPTCHA v3 example
                        </h1>

                        <div class="field">
                            <label for="name" class="label">Name</label>
                            <div class="control">
                                <input type="text" name="name" id="name" class="input" placeholder="Name" required>
                            </div>
                        </div>

                        <div class="field">
                            <label for="email" class="label">Email</label>
                            <div class="control">
                                <input type="email" name="email" id="email" class="input" placeholder="Email Address" required>
                            </div>
                        </div>

                        <div class="field">
                            <label for="message" class="label">Message</label>
                            <div class="control">
                                <textarea name="message" id="message" class="textarea" placeholder="Message" required></textarea>
                            </div>
                        </div>

                        <div class="field is-grouped">
                            <div class="control">
                                <button class="button is-link">Send Message</button>
                            </div>
                        </div>

                        <input type="hidden" name="recaptcha_response" id="recaptchaResponse">
                    </form>
                </div>
            </div>
        </div>
    </section>
</body>
</html>
And the result:
That's all there is to get the service working on the client side. It is now analysing the user, then creating a token and assigning it to a hidden input.
You can find out more about the client side configuration here.
Server side integration
It's now time for a small bit of PHP to validate the user. All this really involves is a POST request to a Google URL, so this can easily be performed in most languages.
Replace 'YOUR_RECAPTCHA_SECRET_KEY' with the Secret key provided in the dashboard, and add the following just above the form:
<?php // Check if form was submitted:
if ($_SERVER['REQUEST_METHOD'] === 'POST' && !empty($_POST['recaptcha_response'])) {
    // Build POST request:
    $recaptcha_url = 'https://www.google.com/recaptcha/api/siteverify';
    $recaptcha_secret = 'YOUR_RECAPTCHA_SECRET_KEY';
    $recaptcha_response = $_POST['recaptcha_response'];

    // Make and decode POST request:
    $recaptcha = file_get_contents($recaptcha_url . '?secret=' . $recaptcha_secret . '&response=' . $recaptcha_response);
    $recaptcha = json_decode($recaptcha);

    // Take action based on the score returned:
    if ($recaptcha->score >= 0.5) {
        // Verified - send email
    } else {
        // Not verified - show form error
    }
} ?>
This code is building the request and sending it to Google, returning an object. You can use cURL to make this request if you prefer it or you are having issues. Depending on the score received, you can perform actions relevant to your application. According to the documentation, 1.0 is very likely a good interaction, 0.0 is very likely a bot'. For simplicity, in the example above I'm accepting all submissions from any user with a score of 0.5 or above.
Please note that reCAPTCHA will timeout eventually if the form is submitted in time. In this case, it might be worth calling 'grecaptcha.execute' on form submit. Whether you need to do this would depend on the length of the form. There is some additional information about this in the comment section of this article.
And here is an example of the object returned:
{
    [success] => 1
    [challenge_ts] => 2018-11-01T22:31:14Z
    [hostname] => recaptcha.local
    [score] => 0.9
    [action] => contact
}
You can find out more about the server side configuration here.
Finishing up
As said previously, this is a very simple example. When being used in production, ensure strong client and server side validation is being used, as with any form. If you require more complex validation, it might be worth looking at the PHP Library.
If you have any comments or suggestions feel free to get in touch using the comment form on this page or send me a Tweet.

