Adding custom columns to the WordPress admin area
This article goes through how to expand on the standard WordPress post listing page in order to provide extra functionality, and show extra information at a glance.
August 2018
WordPress provides plenty of great functionality out of the box. However, adding extra information to the admin area can help massively with the day-to-day running of a website.
In this post I'm going to go through how to add custom columns to the post listing screen. I've created a 'cars' Custom Post Type. A very easy way to do so is to use this generator and add the code provided to the 'functions.php' file, rather than using a plugin. This can also be done with a default 'post' but I'm using a CPT here.
Starting point
For this example, a website is being created for a car sales company (I'm gonna call this Stevie's car sales).
Stevie's car sales has a strict policy that it must make £1000 or more profit on each car sold, or bad things will happen.
I've added some custom meta fields using Advanced Custom Fields. This could also be done with add_post_meta(). This will allow me to enter the bought and sold price for each car:
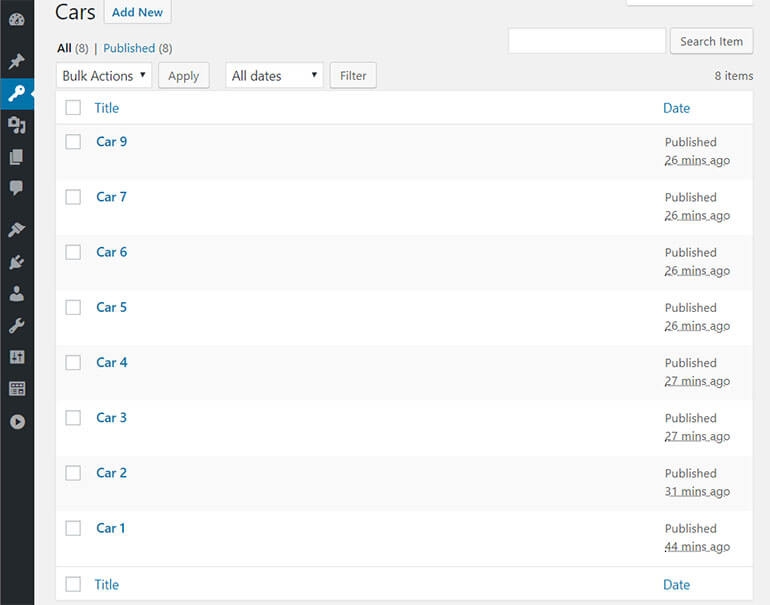
The default listing screen for the cars doesn't provide much useful information. All I get is the car names (creatively named as they are), and the dates they were added to the system. To get further information I would need to open each car individually and get whatever I need. However, what if I want to get more details at a glance, or perform some calculations to see how profits are going? The screen below doesn't help much:
Adding custom column names
It's time to add some custom columns in, making this page much more useful. Let's get the labels at the top sorted first.
Open up the 'functions.php' file in your theme folder: theme_name/functions.php
The code below does a few different things:
- Removes the 'Date' column as it's not really useful in this case
- Adds a 'Bought price' column to show how much each car was purchased for
- Adds a 'Sold price' column to show how much each car was sold for (if they have been sold)
- Adds a 'Profit / Loss' column to show the profit or loss made from selling each car (if they have been sold)
function columns_cars($columns) {
    unset($columns['date']);
    $columns['car_bought_price'] = 'Bought price';
    $columns['car_sold_price'] = 'Sold price';
    $columns['car_profit_loss'] = 'Profit / Loss';
    return $columns;
}
add_filter('manage_cars_posts_columns', 'columns_cars');
This filter is being used here. The important thing with this filter is to make sure the '$post_type' part of the name matches up with the post type you want the columns added to. This will add these nice column labels to the top of the page and remove the date:
Let's talk money
It's now time to actually add the information needed to these columns. I'll take each column one at a time, starting with 'Car Bought price'.
The code below checks to see if the current column is 'Car Bought price', and if so retrieves the price each car was bought for and displays it:
The next step is basically a repeat or the above, but it's grabbing and displaying the sold price. If it hasn't been sold, it will show 'For sale' instead:
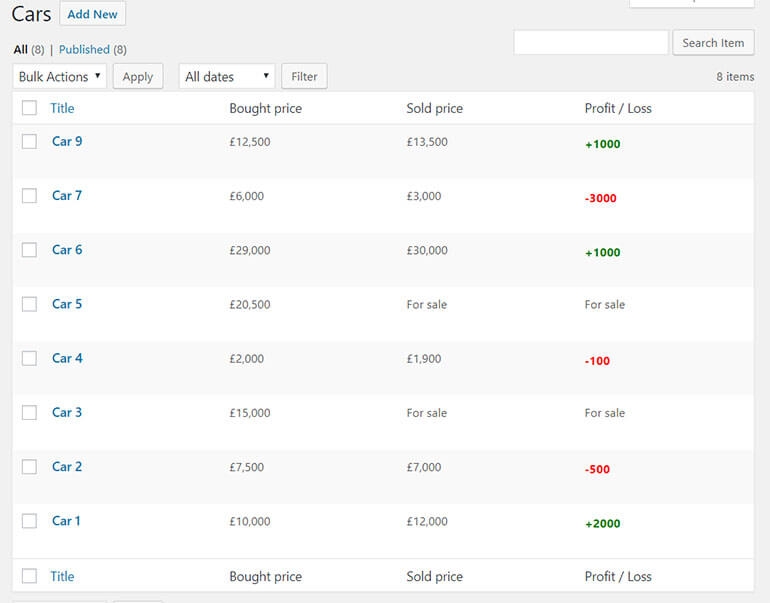
The 'Profit / Loss' column is a bit different and requires a bit more logic. I want to take the 'Bought for' and 'Sold for' prices, and work out the difference between the two to check if I hit the magical £1000+ mark.
If the car hasn't been sold, 'For sale' will be shown as in the previous column. If it has been sold, I'm checking to see if the profit is £1000 or more. If it is, I'm applying a green font colour, otherwise a red font colour will be shown:
And the final step is to close the function and call it via the manage_posts_custom_column() function.
The finished product
Now when the list page is reloaded it will be populated with all the information that was just configured:
Conclusion
As you can see, this is a great way of providing information at a glance for either your own website or a client. As with anything I post, it can be customised as needed to meet the needs of the particular website.
I've provided the full source code below, feel free to use or modify the code!


